 This is a step by step process of my technique with Automotive Airbrushing, the painting is done on an 18" x 24" piece of sheet metal that was prepared at their spray booth; they painted it with a Blue Emerald color that changes depending on the angle you are viewing it from blue to green, then they sprayed a coat of urethane clear so it would be ready for me to Airbrush.
First I sanded the piece with a 1200 grit sandpaper which is very fine, this is only to scuff the surface and allow adherence from the paints that have been prepared to be used with the Airbrush.
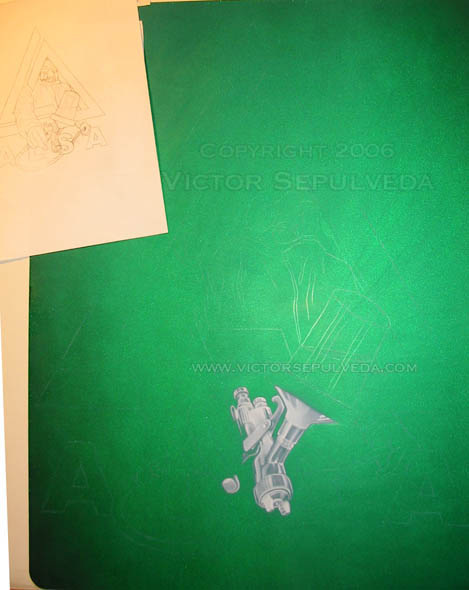 ↖ Next I project the image I had previously sketched on a piece of paper onto the sheet metal; Using a light colored pencil I draw the image. Once the drawing is visible I proceed to paint; In this case the background color is dark so I begin by laying the foundation using a white basecolor and using the background as the shadows and dark areas of the image. It's hard to see on the photo, but for the spray gun I used a color called "Mirra Chrome" which is like a metallic silver with a very fine pigment so you could do fine detail; I used it to make it stand out from the white basecolor.
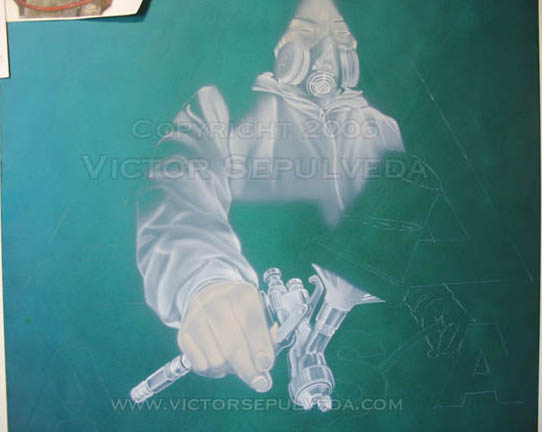 ➚ Here you can see I'm almost done with the White foundation, I used a light tan color for the face and hand but I still let the background show through to represent the shadows and dark areas. Most of my work is done freehand, I like the soft edge look that you get by working like this but mainly I do it because I don't like cutting stencils, plus I change my mind constantly as I'm working on a painting so I wouldn't want to spend time on a stencil and then not use it, there's more freedom if you freehand all your work.
On this next step you can see how I start detailing the image; I start shading from light to dark so I'm constantly changing colors and I always do a section at a time, for the skin color I use three different shades of brown plus orange or yellow depending on the skin color I'm trying to achieve. The white paint leaves more overspray than the black paint so I always try to finish the detail with black to cut the edges and give it a more clean and sharp look.

I painted the guy holding the spraygun first trying to leave the area of the logo clean, but I didn't have to be too careful because the logo is in the foreground and it will be taped off but first I need to finish the image and the background effects.
So far I like the paints, they have very good line and flow control; Also you can mix the colors on the bottle to make your own colors or tones. I am very picky when it comes to paints because I use very thin mixtures to get the smallest details and so far they are working really good; Over the years I have tried many different brands but I am hardly satisfied with the results.
 On this step I decided to do some graphics on the background so the design wouldn't look so simple, especially because the triangle of the logo left two big open spaces on the left and right of the design. I cut out a couple of stencils of a motorcycle and a spraygun and a couple of overlapping lines; I painted these using a turquoise blue very lightly so they wouldn't stand out too much.
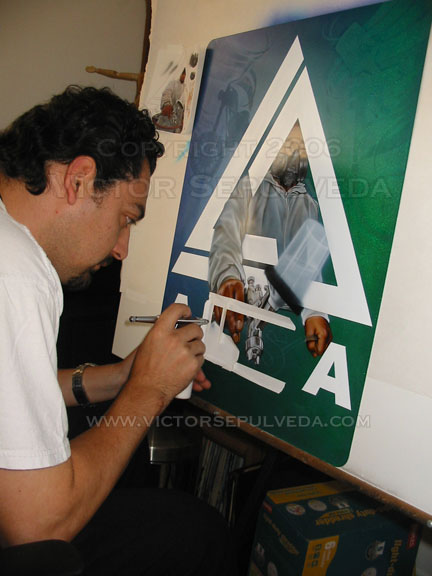
Now the image is starting to look finished, I am very pleased how the background graphics look finished. Here I am painting the logo and letters, first I taped off the triangle shape and I cut out each of the letters to spray them with white. It is a very simple step because there is no shading or detail but you have to cut out the letters, and make sure there are no gaps where the paint could overspray.

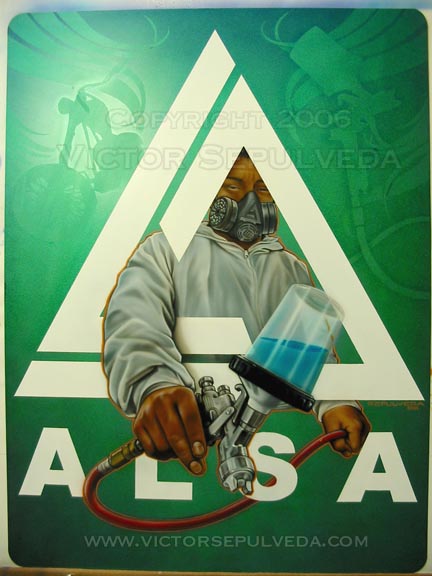
I decided to do a complimentary outline using orange on the guy holding the spraygun, the purpose of this is to make it stand out a little more against the big white shape of the Logo and the blue/green background. Next I make sure the signature is visible, and do any finishing touches before I can say it is finished. I hope they like it at ALSA Corp. I had a lot of fun working on this piece.
Now the Painting is finally finished. the only thing left is to shoot a clearcoat to bring out the vibrancy of the colors as well as the sparkles and pearls; And to give it that wet shiny look to be displayed. I'd like to hear any comments or questions about the piece. www.victorsepulveda.com

7 comments:
Hey Super Victor !
Me gusto mucho tu consepto para el logo de Alsa , no se podia esperar menos de ti, pero mas aun me gusto este sistema de blogg para mostrar tu trabajo , ya habia visto algo , pero este esta super te FELICITO
Your friend
Gerald Mendez
See you at Alsa Show.
Your website has a useful information for beginners like me.
»
Dude! I can totally see that the VisCom base is working for you. Good Job....But! I think there should be more of Victor in the eyes.
Exelente brother, sos de mucha
inspiración para la mara aqui
en Guatemala siempre estamos esperando lo nuevo que creas
nuevamnete Felicitaciones!!!
zame. (Guatemala C.A.)
Awsome work man, nice and clean !!!!
Nice clean work man. Thanks for the walk through.
you know gerald mendez???? man you guys are the greatest airbrushers in the world.
Post a Comment